I LOVE tutorials, don't you?! Especially when they come with LOTS of pictures! So when my friend, DeMo, suggested I post a vector art tutorial on my blog I thought it was a great idea! My techniques are not closely guarded secrets—I strongly object to designers keeping design secrets from one another! The vector illustrations I create are actually quite simple and only require patience and the ability to squint your eyes! Now, prepare yourself for the longest post my blog has ever seen. Are you ready, class? Let's dive in!
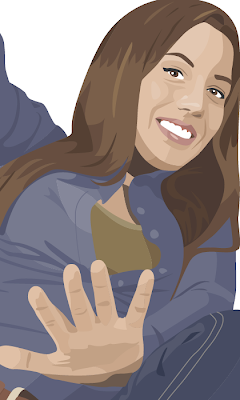

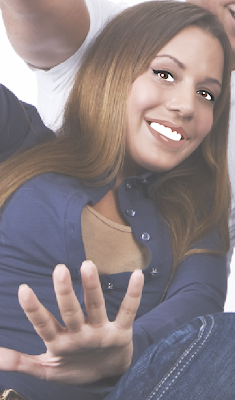
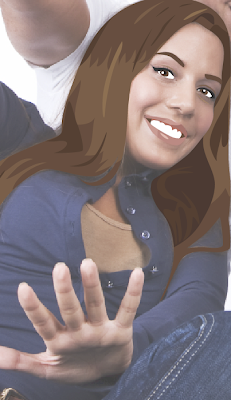
Ok, this is the image we will be working with. It is one girl that is part of a larger photo. I do my work in Illustrator CS2. These images show you the original photo, and the finished vector art.
First, open the photo in Illustrator. Select the photo, and in the Transparency palette bring the opacity down to about 60-80%. This will make your paths easier to see when you draw on top of the photo, and also help hide the unimportant details so they don't distract you. Lock the photo layer, and create a new layer to start the drawing!
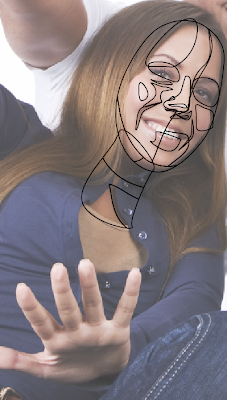
Set your stroke to black and your fill to empty. Set the stroke weight to .25. Using the Pen Tool, begin outlining the perimeter of her face. Now start squinting to see where the main shadows and highlights are in the face. Trace each shadow/highlight. At the very least a face will have 4 degrees of color. The darkest shades are always around the eyes and under the nose. The lightest is always on the tip of the nose. As you're drawing, keep in mind the layer order that you are creating. Trace large areas of color first, and the smallest areas of color last. Ignore the boundaries of hair, eyes, and smile for now.
My advice: Know your Pen Tool!!! This tool is frustrating for beginners, but with enough practice you can master its subtleties. Modifier keys are essential to use with the Pen Tool, and pressing space bar while drawing a point will allow you to reposition its placement.
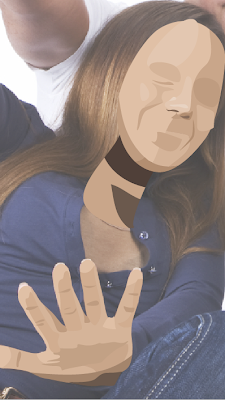
Once you're satisfied with the job you've done of scribbling all over her face, begin coloring the paths. (Open the "Skintones" color palette for a good place to start.) Reposition the path layers as necessary to make sure none of them get lost underneath the others. After the skin of the face is complete, go through the same process to draw other areas of skin, like hands.
Occasionally you may want to hide the photo layer to see your progress and make sure you're not leaving any gaping holes between paths. (I always think they look kinda freaky/cool at this point without any eyes or mouth!)
Now let's temporarily hide the skin layer(s) so we can draw the eyes and mouth. Same process as before. (Be sure to zoom in close for this, don't try to do it from far away!) I usually use the circle tool to draw the pupil because it can look funny if it's not a perfect circle. Btw, did you know that in photos people's eyes and teeth are grey/yellow and not white? Shocker! Let's do them a favor and color them white anyways. It also helps to add a little circle of white reflection in their eyes. Instant depth.
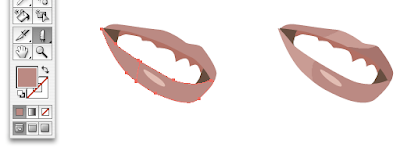
Before we move on, I want to explain a technique I use a lot. I've zoomed in on the mouth to show you that when I draw the lips, they start out as only one or two paths, all the same color. This screenshot shows how I selected the lower lip on the left, then used the Knife Tool to cut through it. Now it is two separate paths that can be colored independently. In the smile on the right I cut and colored the bottom lip once, and the top lip twice. I use the Knife tool a lot to help me break up the colors in a solid path.
After the skin, eyes, and smile, it's time for the hair! Hair like this can be quite intimidating because we see so many little lines and streaks and shade differences. Remember to just be patient and to squint your eyes! Squinting will help you drown out the details and see the big picture. After the hair is finished, continue on to draw the clothes. I think clothes are fun because they have VERY distinct shadows in the fold lines—but that makes it easy to overlook the highlights. Always draw both shadows & highlights because illustrations will look flat if you have one without the other.
(All these elements are drawn the same way: everything in a black .25 stroke and filled with color after all shadows & highlights are traced.)
Finally, when we turn on all the layers and reorder them correctly, we have a beautiful finished vector illustration! (See finished vector at the top of the post!)
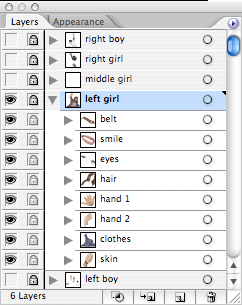
Below is a screenshot of what my layers palette looks like after finishing all the elements. In this particular project I was doing a group photo, so each person had their own layer and all the elements—skin, hair, clothes, etc—were grouped inside the layers. But if you're only doing one person, it makes more sense to give all the elements their own layers.
That completes my tutorial! Let me know if you have questions about anything I didn't cover, if you have suggestions for other tutorials, or if you think this was incredibly long-winded and never want to see me post another tutorial again—all comments welcome!


